| Check out our Crew Member course on Hours+ in Learning On-Demand. |
This article shows you how to perform this task in both Classic and New experiences.
Steps for Classic Experience
Watch: How To Fill Out A Timecard:
How it Works
Choosing your preferred time format
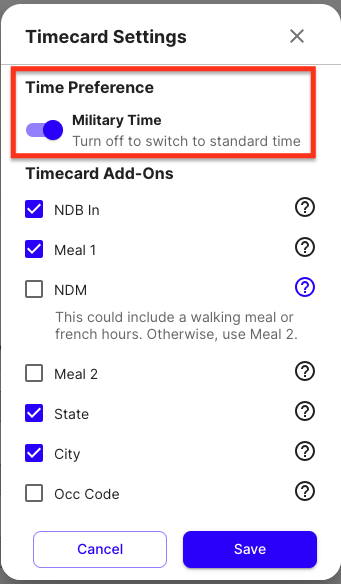
Hours+ allows you to choose between entering times via Military Time or AM/PM format.
Hours+ has Military Time as the default format. To switch to AM/PM, you can do so using the “More Options” button: ![]()
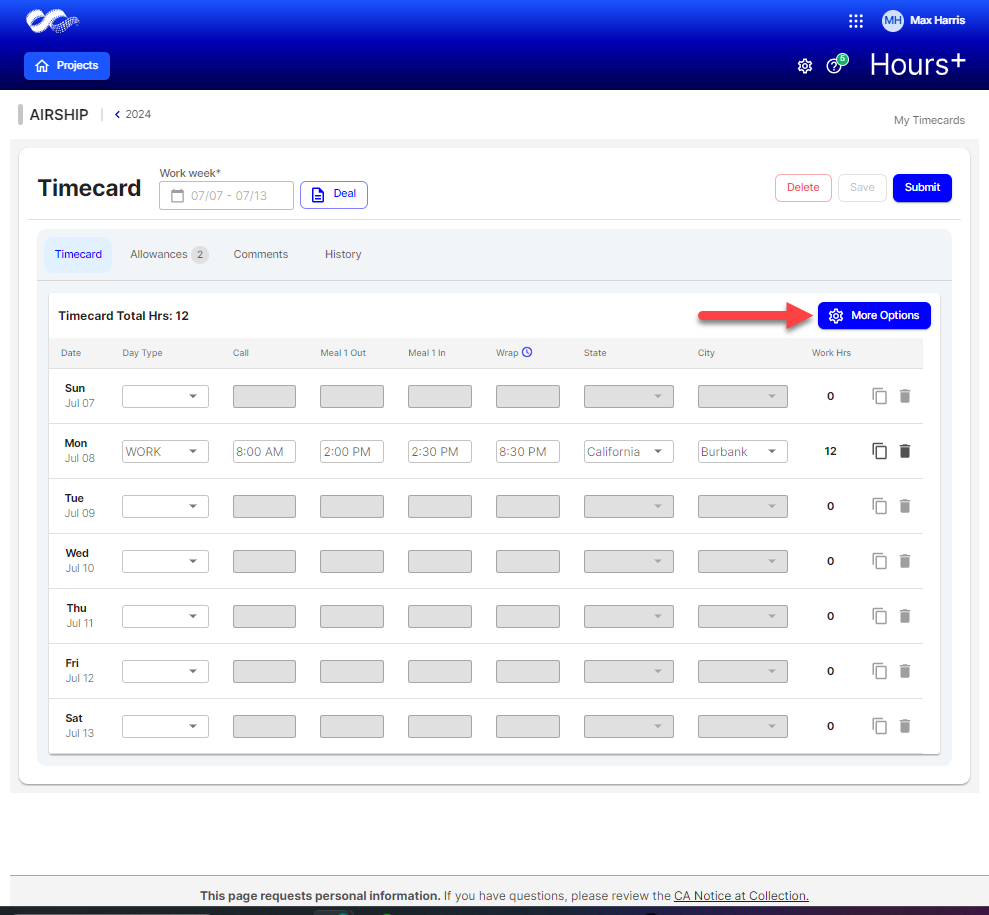
This will allow you to switch to AM/PM format:
The system will round up in 6-minute increments
Start and stop times recorded in your timecard are rounded to the nearest tenth of an hour (i.e. 6-minute increments). Time rounding makes it easier for payroll to calculate the total time you worked in a day.
Example: If you start work at 8:01 a.m. and enter 8:01 into your timecard with a colon, it will round up to 8:06.
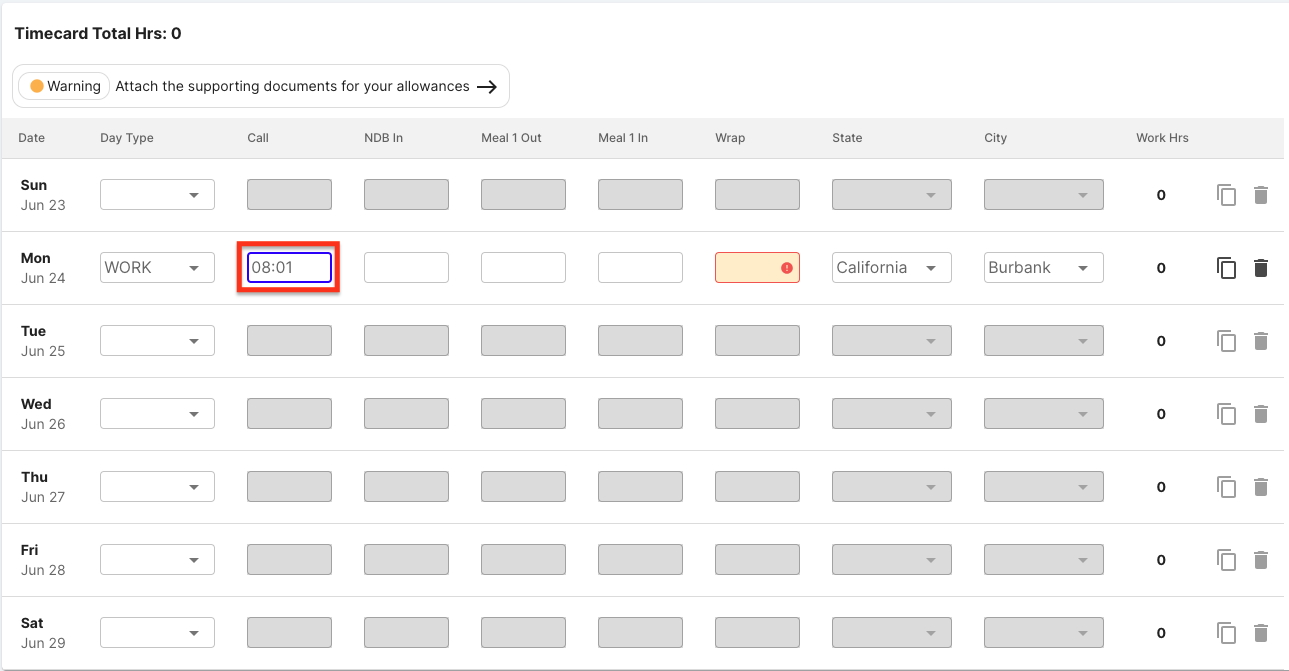
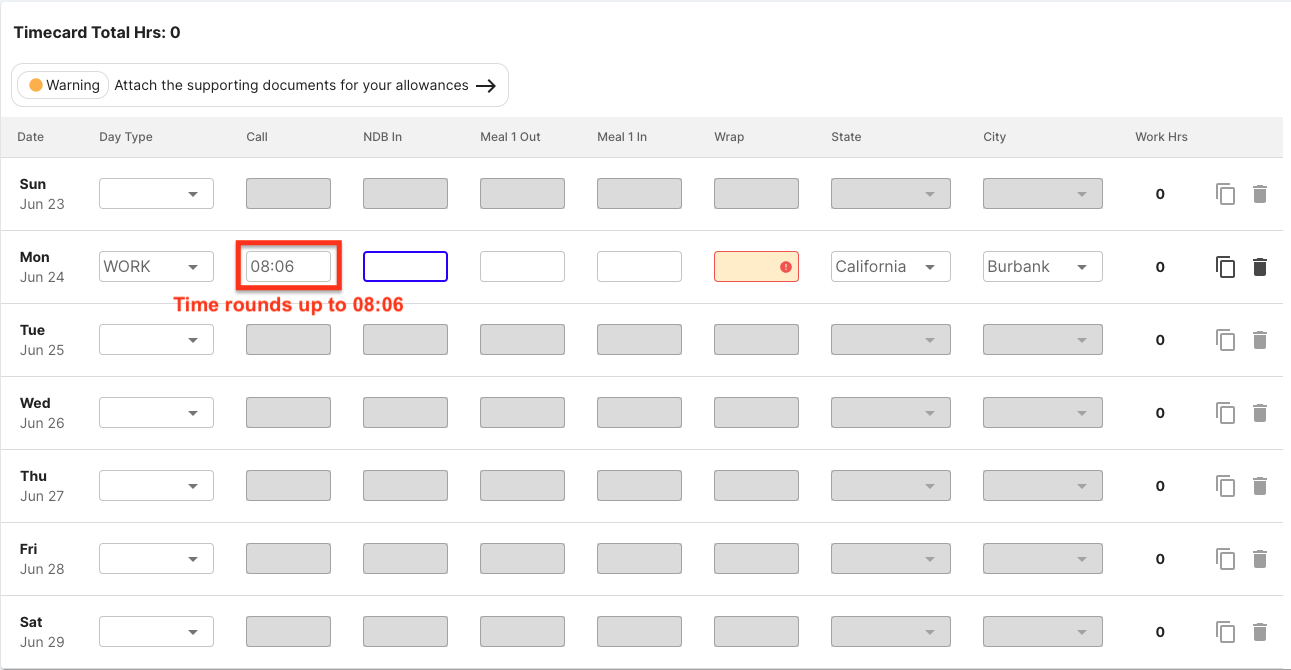
This lets payroll know that you started work in the 1st tenth of the hour. You could also enter it as 8.1.
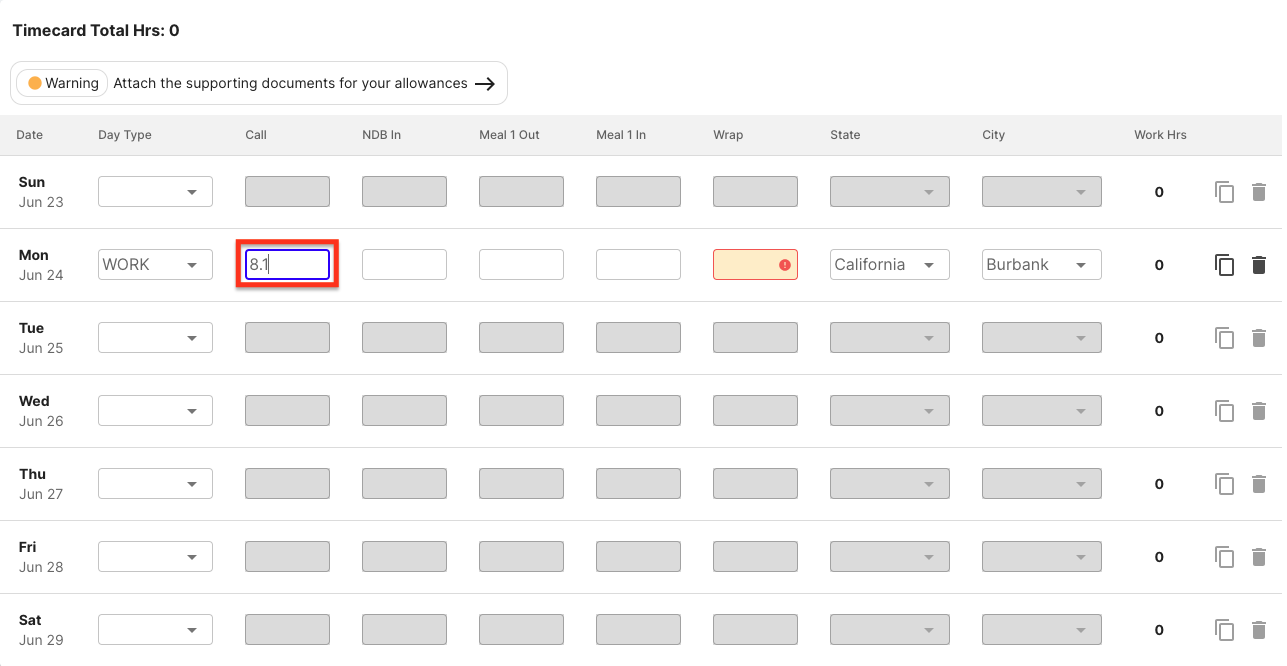
[decimal format]
You can enter your time in minutes (using ":") or in decimals (using ".")
If you enter your time in decimal format, the system will automatically update it to hour:minute format (00:00) in the proper 6-minute increment.
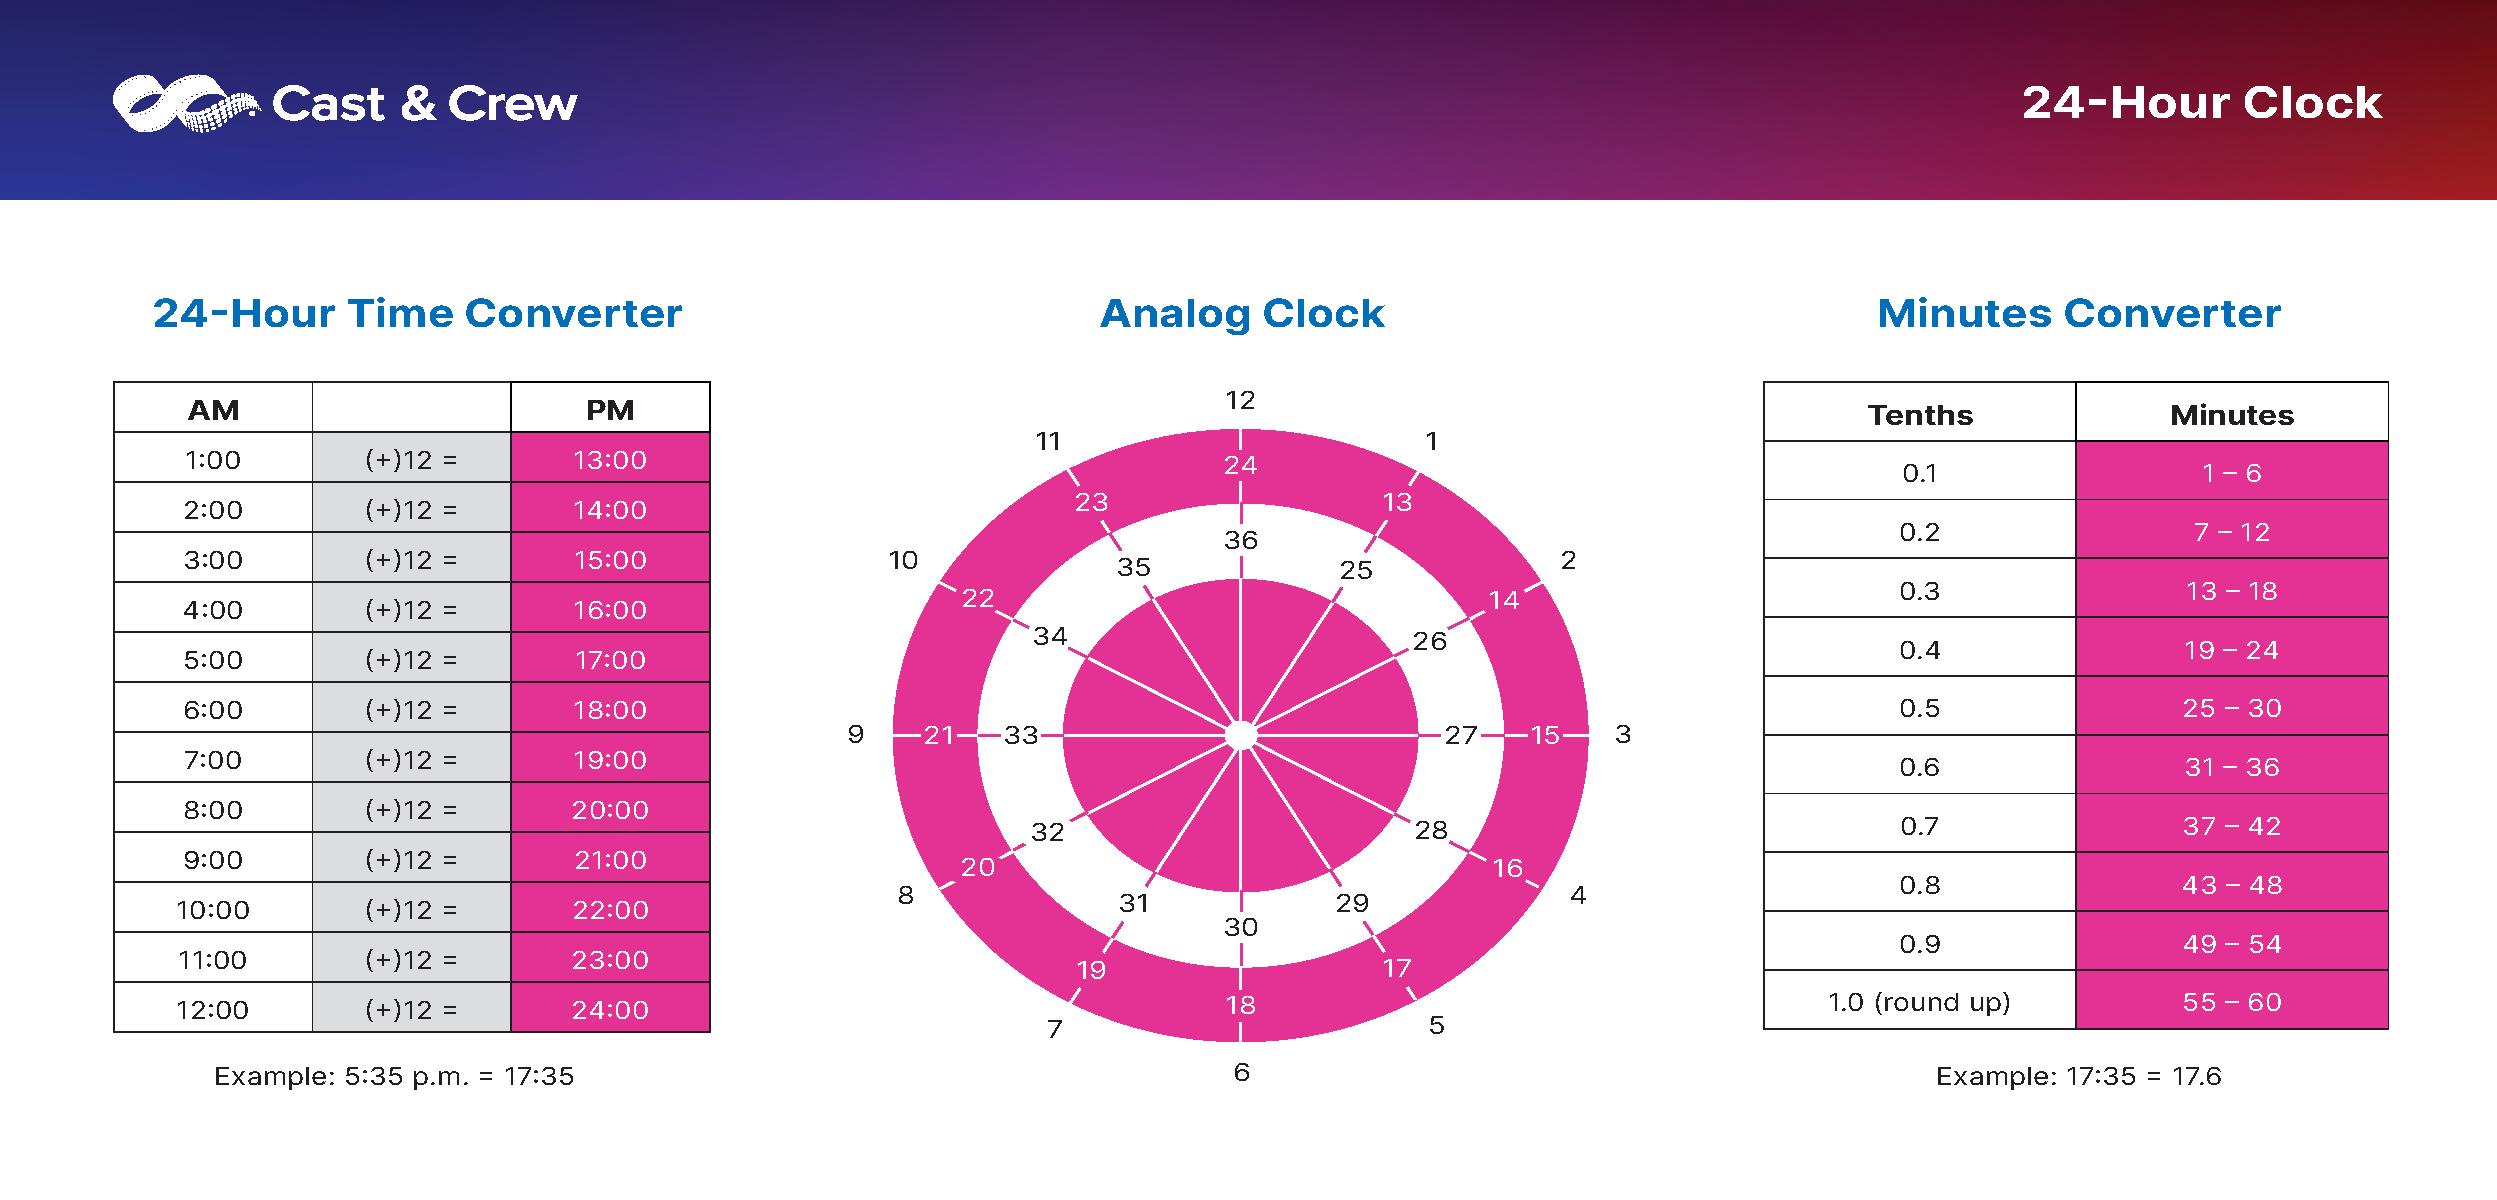
Time Conversion Chart
In case you need it:
How to Enter Time on Your Timecard on Desktop
-
Create a Timecard or Finish an existing Timecard that was made for you in Hours+. If you're unsure how to do this, refer to this article.
- You can start the timecard creation process from either your dashboard or from within Hours+.
-
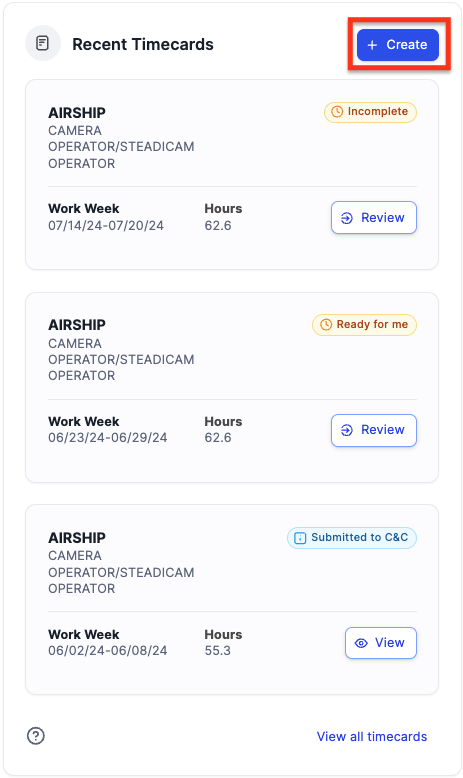
From your dashboard: Click the '+Create' button in the recent timecards section and select the project:
-
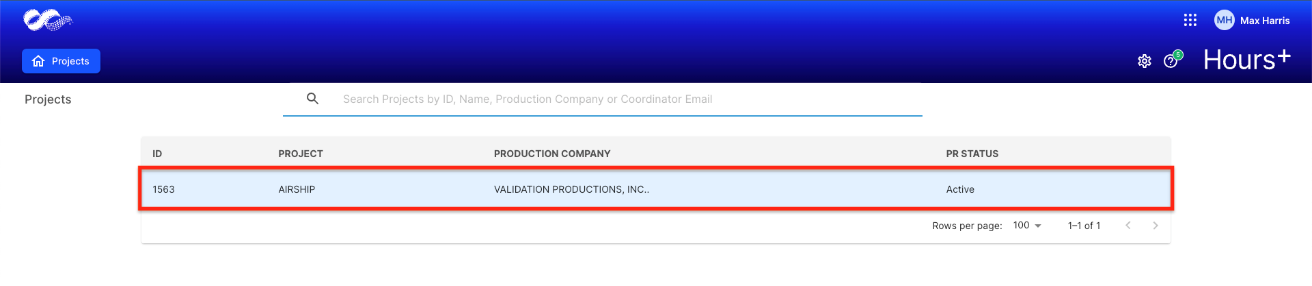
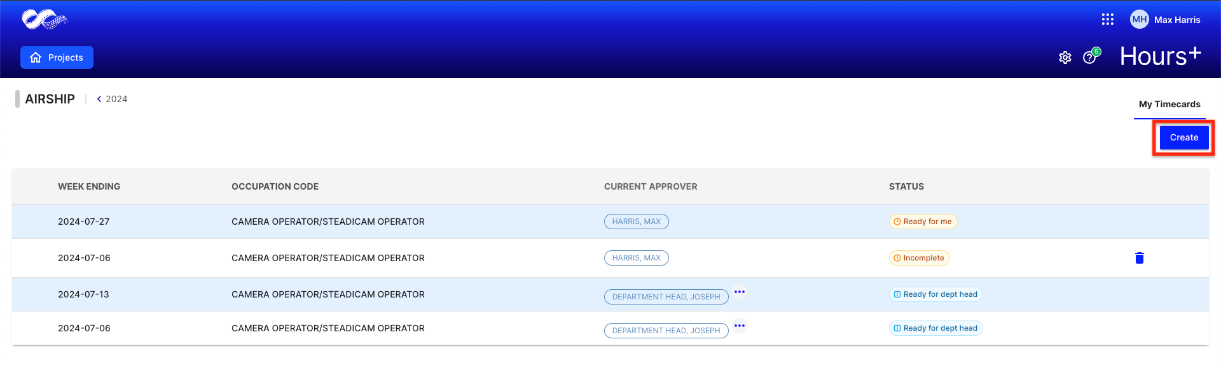
From within Hours+: If you have opened Hours+ already, select your project and then click 'Create':
-
From your dashboard: Click the '+Create' button in the recent timecards section and select the project:
- You can start the timecard creation process from either your dashboard or from within Hours+.
- Fill out your timecard with the appropriate information and enter your time using the information at the beginning of this article.
- Ensure the correct work week is selected.

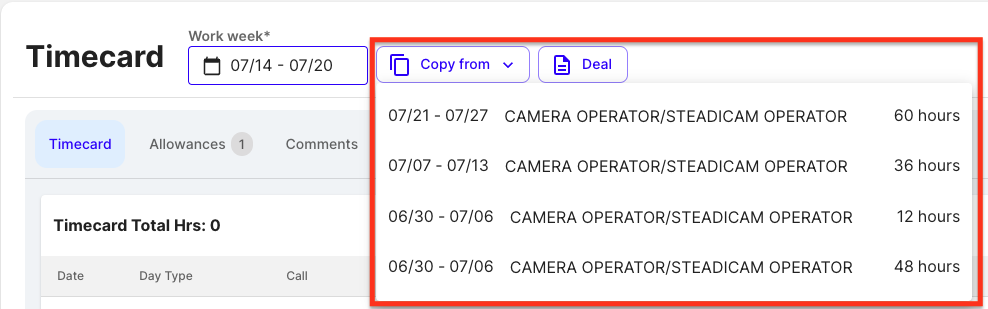
- If you want to copy times from a previous timecard, use the “Copy from” dropdown and select a previous timecard to copy from:
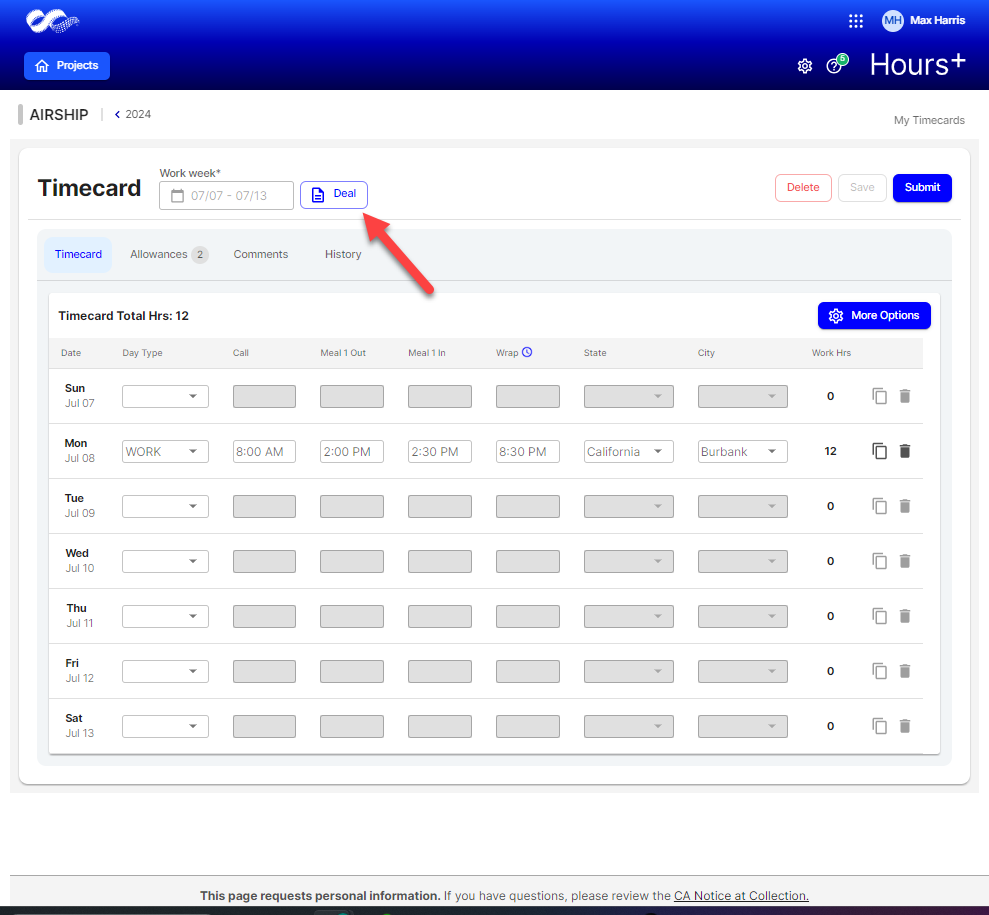
- If you have signed more than one deal memo and worked a different occupation for the week, click 'Deal' to select the correct one.
- Once you enter times for at least one day of the week, you can copy those times to another day with the copy button. Click the button and then select which days you would like to copy times to, and click 'Copy':
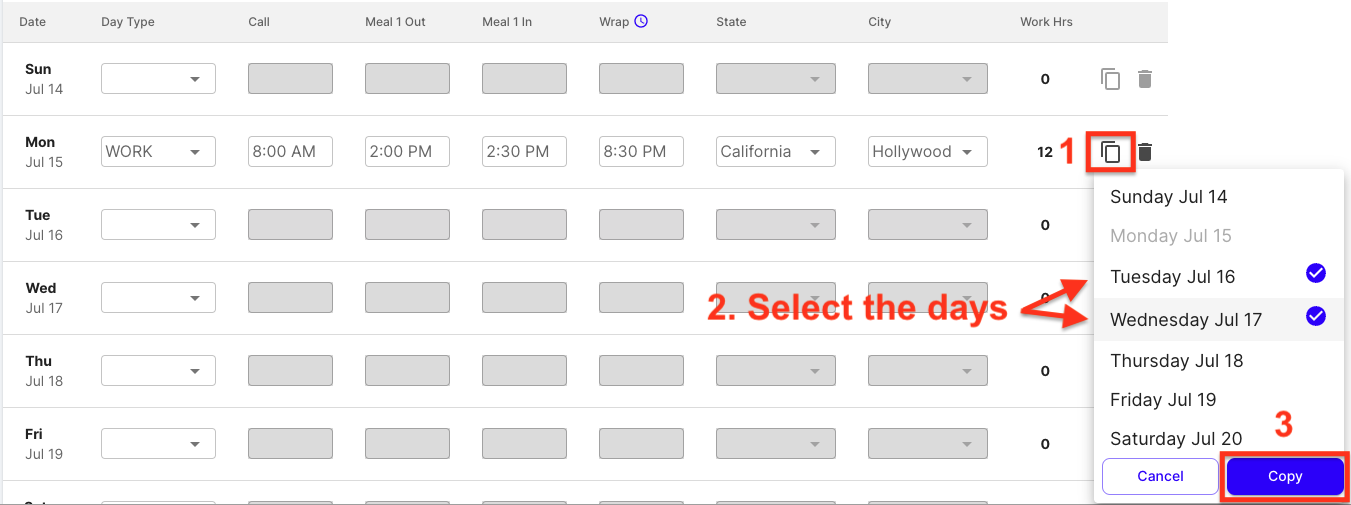 The values will be pasted to the days you selected:
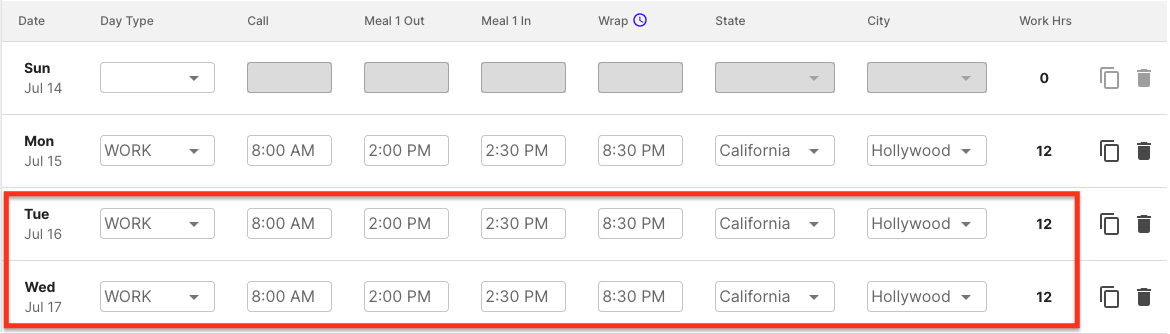
- On most shows, allowances will be automatically added to your timecard based on your days worked. To view your allowances, click the Allowances tab.
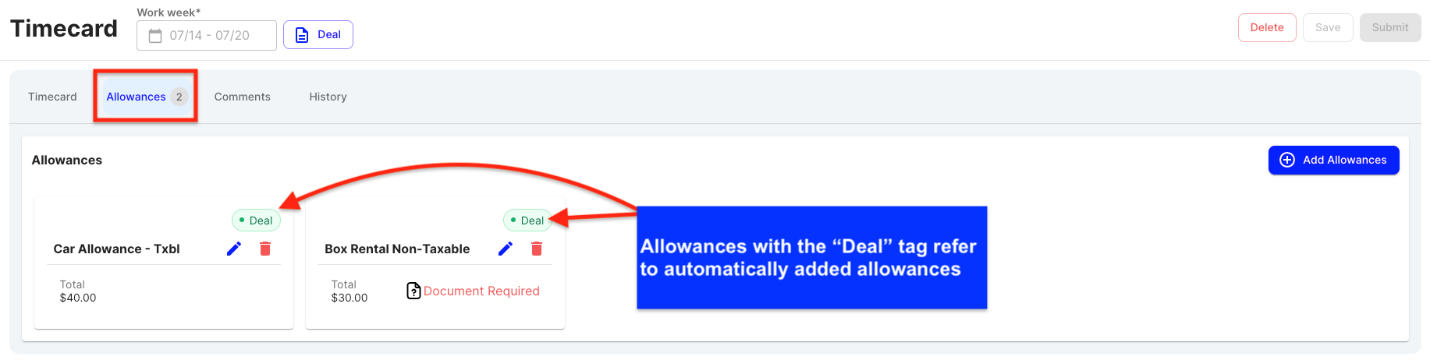
- Some allowances may require a supporting document:

- For these allowances, you have the option to upload your supporting document or opt-out and choose to be taxed:
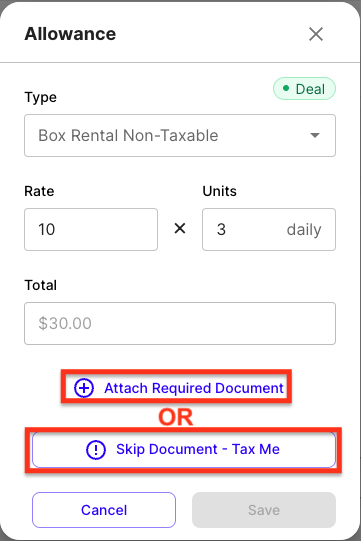
- Some allowances may require a supporting document:
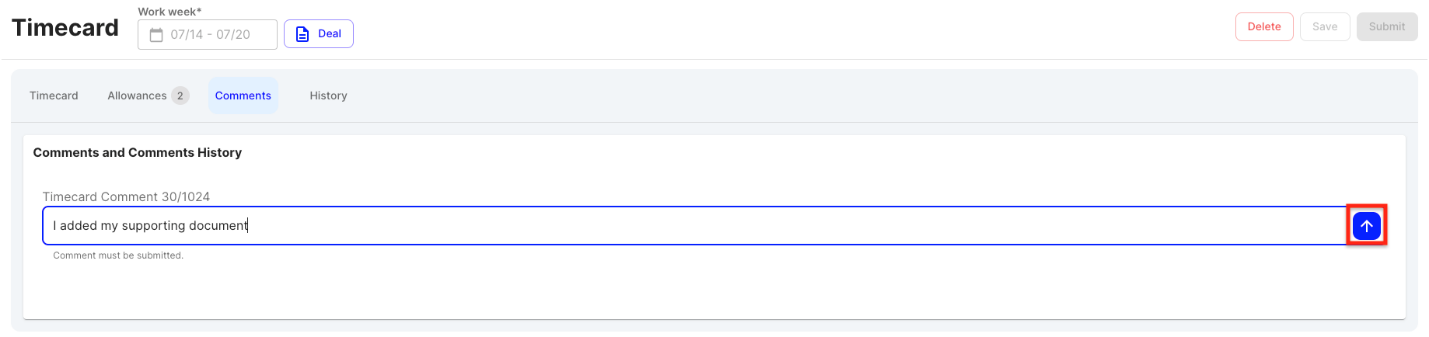
- If there are any comments you can add to clarify details of your timecard, add them in the Comments tab. Enter your comment then click the Blue Arrow button to submit it:
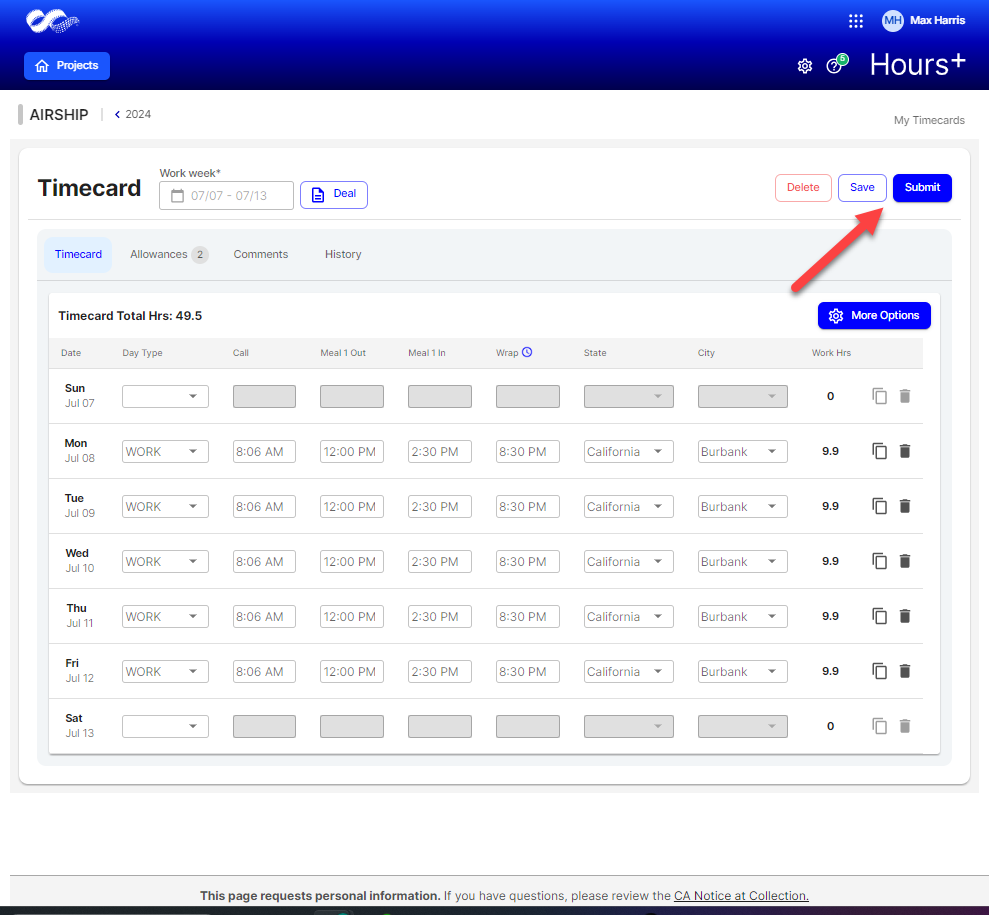
- Click Save to complete later or click Submit when you're ready to submit your timecard for approval.
How to Enter Time on Your Timecard on Mobile
-
Create a Timecard or Finish an existing Timecard that was made for you in Hours+. If you're unsure how to do this, refer to this article.
- You can start the timecard creation process from either your dashboard or from within Hours+.
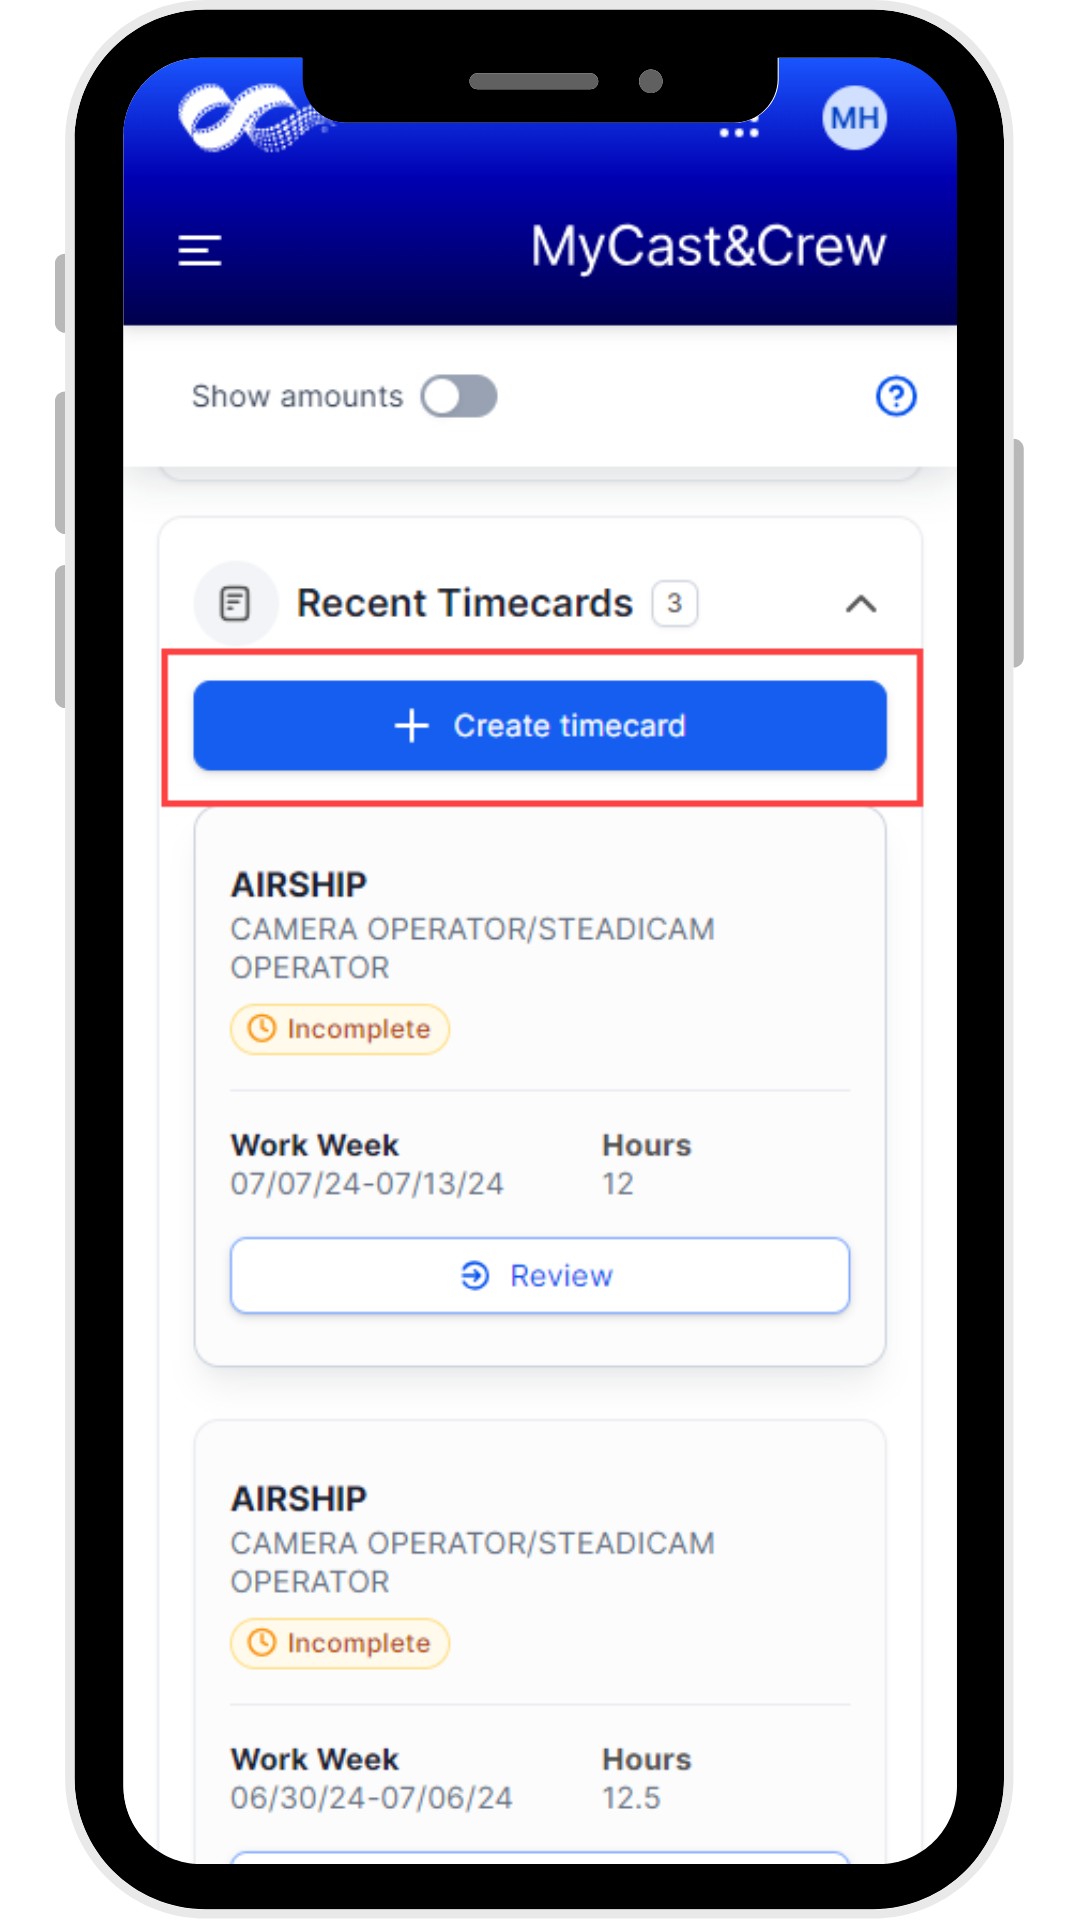
- From your dashboard: Tap the + Create timecard button in the recent timecards section and select the project
-
From within Hours+: If you have opened Hours+ already, select your project and then tap Create:
.png)
.png)
- From your dashboard: Tap the + Create timecard button in the recent timecards section and select the project
- You can start the timecard creation process from either your dashboard or from within Hours+.
- Fill out your timecard with the appropriate information and enter your time using the information at the beginning of this article.
- Ensure the correct work week is selected.
.png)
- If you want to copy times from a previous timecard, use the “Copy from” dropdown and select a previous timecard to copy from:
.png)
- If you have signed more than one deal memo and worked a different occupation for the week, tap 'Deal' to select the correct one.
- To add times to a day, simply tap on the day you need to add times to, and then tap Save.
.png)
- 💡Tip: Each time you enter hours for a day and tap Save, your entire timecard will be automatically saved!
- You can copy the times you are entering to other days on the timecard with the “Select A Day To Copy Times” dropdown. Select the days you would like to copy your times to and then tap Save.
.png)
- On most shows, allowances will be automatically added to your timecard. To view your allowances, tap the Allowances tab:
.png)
-
Note: Some allowances may require a supporting document:
- For these allowances, you have the option to upload your supporting document or opt-out and choose to be taxed:
-
Note: Some allowances may require a supporting document:
- If there are any comments you can add to clarify the details of your timecard, add them in the Comments tab. Enter your comment then hit the Blue Arrow button to submit it.
.png)
- You can stop at any point and finish your saved timecard later, or tap 'Submit' if you're ready to submit your timecard for approval.
Steps for New Experience
Watch: How To Fill Out A Timecard:
Click here to watch the mobile version 📱
How it Works
Choosing your preferred time format
Hours+ allows you to choose between entering times via Military Time or AM/PM format.
Hours+ has Military Time as the default format. To switch to AM/PM, you can do so using the “More Options” button:
This will allow you to switch to AM/PM format:
The system will round up in 6-minute increments
Start and stop times recorded in your timecard are rounded to the nearest tenth of an hour (i.e. 6-minute increments). Time rounding makes it easier for payroll to calculate the total time you worked in a day.
Example: If you start work at 8:01 a.m. and enter 8:01 into your timecard with a colon, it will round up to 8:06.
This lets payroll know that you started work in the 1st tenth of the hour. You could also enter it as 8.1.
[decimal format]
You can enter your time in minutes (using ":") or in decimals (using ".")
If you enter your time in decimal format, the system will automatically update it to hour:minute format (00:00) in the proper 6-minute increment.
Time Conversion Chart
In case you need it:
How to Enter Time on Your Timecard on Desktop
-
Create a Timecard or Finish an existing Timecard that was made for you in Hours+. If you're unsure how to do this, refer to this article.
- You can start the timecard creation process from either your dashboard or from within Hours+.
-
From your dashboard: Click the '+Create' button in the recent timecards section and select the project:
-
From within Hours+: If you have opened Hours+ already, select your project and then click 'Create':
-
From your dashboard: Click the '+Create' button in the recent timecards section and select the project:
- You can start the timecard creation process from either your dashboard or from within Hours+.
- Fill out your timecard with the appropriate information and enter your time using the information at the beginning of this article.
- Ensure the correct work week is selected.
- If you want to copy times from a previous timecard, use the “Copy from” dropdown and select a previous timecard to copy from:
- If you have signed more than one deal memo and worked a different occupation for the week, click 'Deal' to select the correct one.
- Once you enter times for at least one day of the week, you can copy those times to another day with the copy button. Click the button and then select which days you would like to copy times to, and click 'Copy':
The values will be pasted to the days you selected:
- On most shows, allowances will be automatically added to your timecard based on your days worked. To view your allowances, click the Allowances tab.
- Some allowances may require a supporting document:
- For these allowances, you have the option to upload your supporting document or opt-out and choose to be taxed:
- Some allowances may require a supporting document:
- If there are any comments you can add to clarify details of your timecard, add them in the Comments tab. Enter your comment then click the Green Arrow button to submit it:
- Click Save to complete later or click Submit when you're ready to submit your timecard for approval.
How to Enter Time on Your Timecard on Mobile
-
Create a Timecard or Finish an existing Timecard that was made for you in Hours+. If you're unsure how to do this, refer to this article.
- You can start the timecard creation process from either your dashboard or from within Hours+.
- From your dashboard: Tap the + Create timecard button in the recent timecards section and select the project
-
From within Hours+: If you have opened Hours+ already, select your project and then tap Create:
- From your dashboard: Tap the + Create timecard button in the recent timecards section and select the project
- You can start the timecard creation process from either your dashboard or from within Hours+.
- Fill out your timecard with the appropriate information and enter your time using the information at the beginning of this article.
- Ensure the correct work week is selected.
- If you want to copy times from a previous timecard, use the “Copy from” dropdown and select a previous timecard to copy from:
- If you have signed more than one deal memo and worked a different occupation for the week, tap 'Deal' to select the correct one.
- To add times to a day, simply tap on the day you need to add times to, and then tap Save.
- 💡Tip: Each time you enter hours for a day and tap Save, your entire timecard will be automatically saved!
- You can copy the times you are entering to other days on the timecard with the “Select A Day To Copy Times” dropdown. Select the days you would like to copy your times to and then tap Save.
- On most shows, allowances will be automatically added to your timecard. To view your allowances, tap the Allowances tab:
-
Note: Some allowances may require a supporting document:
- For these allowances, you have the option to upload your supporting document or opt-out and choose to be taxed:
-
Note: Some allowances may require a supporting document:
- If there are any comments you can add to clarify the details of your timecard, add them in the Comments tab. Enter your comment then hit the Green Arrow button to submit it.
- You can stop at any point and finish your saved timecard later, or tap 'Submit' if you're ready to submit your timecard for approval.