Learn how to easily create an offer for your crew in this step-by-step guide.
As a hiring manager, one of your principal responsibilities is to create offers for crew members. Great news, Start+ makes the process easy.
Jump to a section in this guide:
Review the Documents Collection
Watch: Creating an Offer
- After logging into Start+, select your project.

- Then click the Create Offer tab at the top of the page.

Select Your Crew
Before you create the offer, you'll need to choose the crew members to whom you'll be sending it on the "Select Crew Members" sidebar. Crew members are listed based on the most recently added. Start+ provides several methods for finding a crew member:
- You can scroll the list.

- You can click the Filter icon (
 ) to see crew members with offers or without offers. You can also sort by ascending or descending by clicking the (AZ) icon next to Filter.
- You can also search for a crew member.

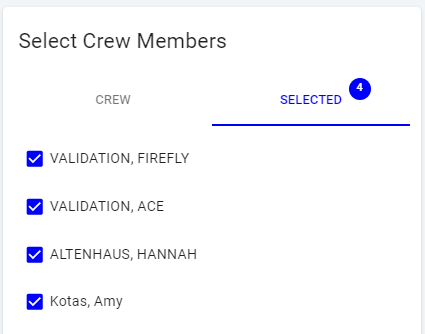
You can send an offer to multiple crew members. Notice the count that appears:

Clicking Selected displays only the names you checked. To see all crew members, simply click Crew.

Define the Terms of Hire
What you see on the Create Offer page is dependent on your union contracts.
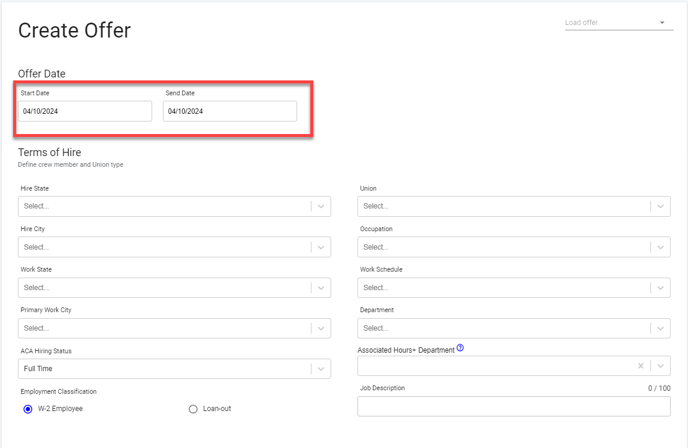
After selecting one or more employees, you must provide a Start and Send Date, both of which default to today. Ensure that you are selecting the correct Start Date since it affects which union contract Start+ uses. Don’t worry, you can also change the Start Date if needed and the terms of hire information will stay as is. Anticipated End Date is optional.
If you are creating an offer for a television project, you must also select the Season. Click the dropdown to view the available seasons.

Complete the Terms of Hire. Updating a selection could affect other fields. For example, changing the union requires you to choose a new occupation, work schedule, and department.
Notice that the "Terms of Employment" section does not display any rates yet. You must complete all Terms of Hire fields, including Work Schedule.

Start+ accesses the scale rates based on your union contract if they are available.
- If the rate is at scale, then the new scale rate will be automatically filled in.
- If the rate is negotiated, then the same rate will remain.
“Below scale” warning messages may appear if applicable.
Note: You can still edit the fields even after the Terms of Employment table populates.
Adding an Allowance
When creating an offer, you can include an allowance such as per diem or box rental.
You can also add a cap and a duration. The "Duration" field is numeric and can represent days or weeks, depending on what you select for the allowance.

If you have permission to add account codes, you can do so by clicking Set Account Codes.

Start+ allows you to add deal notes, which can be viewed by everyone, including the Cast & Crew payroll coordinator. After entering your note, click Save Deal Note.

Your note will appear here. If you need to update it, you can do so by clicking Edit Deal Note.

Review the Documents
Next, review the documents currently included in the offer to ensure nothing is missing and to address any questions related to a specific form.
Documents are divided into two columns: "Recommended" and "Available." To see all documents in a column, you can scroll.

The Custom Questions section displays any additional questions relating to a particular document that must be answered, which are created per project.

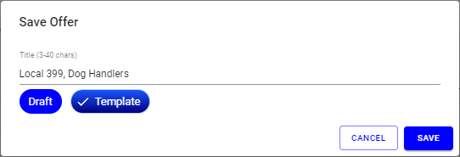
💡 Tip: You can choose to save the offer as a Draft and finish it at a later time, or save it as a Template to use for future offers. Simply click Save, give your saved offer a name, and select 'Draft' or 'Template,' then click Save once more.

All saved offers can be loaded from the top-right dropdown on the Create Offer page.

Once you have provided all the required information, click Verify to continue.

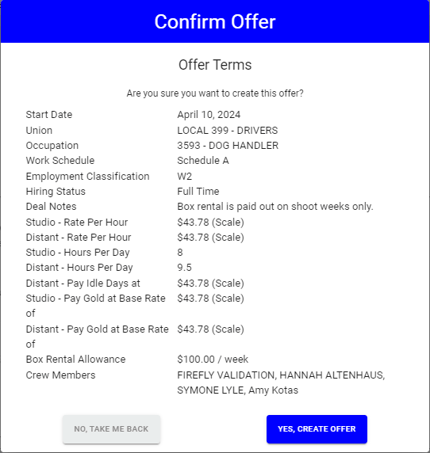
Confirm the offer terms and click Yes, Create Offer.


