As a hiring manager, one of the principal responsibilities is to create offers for crew members. Great news, Start+ makes the process easy.
If you'd like to learn about this topic in a video format, check out our course in EDGE On-Demand.
In this guide, we will cover:
- Selecting a crew member
- Defining the terms of hire
- Adding an allowance
- Reviewing the documents collection
1. After logging into Start+, select your project.

2. Click Create Offer.
Selecting a crew member
3. Notice the sidebar on the Create Offer page. Crew members are listed by most recently added. Start+ offers several ways to find a crew member:
- You can scroll the list.

- You can click the Filters icon to see crew members with offers or without offers.

- You can also search for a crew member.

4. You can send an offer to multiple crew members. Notice the count that appears.

5. Clicking Selected displays only the names you checked. To see all crew members, simply click Crew.

Defining the terms of hire
6. What you see on the Create Offer page is dependent on your union contracts.
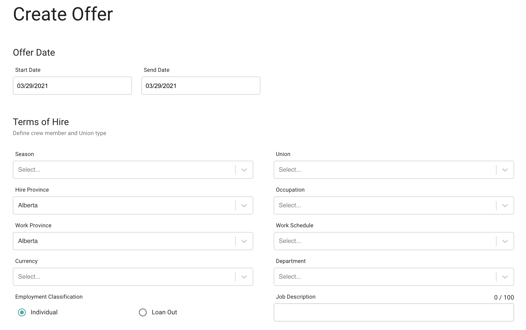
7. After selecting one or more employees, you must provide a Start and Send Date, both of which default to today. Ensure that you are selecting the correct Start Date since it affects which union contract Start+ uses. Anticipated End Date is optional.
 8. If you are creating an offer for a television project, you must also select the Season. Click the dropdown to view the available seasons.
.png?width=449&name=Start+%20Season%20Image%20Crop%20(2).png) 9. Complete the Terms of Hire. updating a selection could affect other fields. For example, changing the union requires you to choose a new occupation, work schedule, and department.
9. Complete the Terms of Hire. updating a selection could affect other fields. For example, changing the union requires you to choose a new occupation, work schedule, and department.
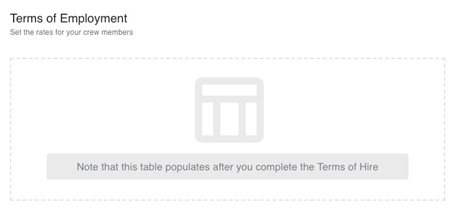
10. Notice that the "Terms of Employment" section does not display any rates yet. You must complete all Terms of Hire fields, including Work Schedule.

11. Start+ accesses the scale rates based on your union contract if they are available.
Note: You can still edit the fields even after the Terms of Employment table populates.

Adding an allowance
12. When creating an offer, you can include an allowance such as per diem or box rental. In this example, we’ve added a box rental at $100 per week.
Note: You can also add a cap and a duration. The "Duration" field is numeric and can represent days or weeks, depending on what you select for the allowance.

13. If you have permission to add account codes, you can do so by clicking Set Account Codes. Account codes configured by department will be the default.

14. Start+ allows you to add deal notes, which can be viewed by everyone, including the Cast & Crew payroll coordinator. This is where you'll add:
- Any vacation benefits for non-union Individuals or loan-out employees, which are required.
- Currency differences between allowances and wages.
- Any other details the crew needs to be informed of.
15. After entering your note, click Save Deal Note. Your note will appear here. If you need to update it, you can do so by clicking Edit Deal Note.

Reviewing the Documents Collection
16. Next, you must review the documents currently included in the offer to ensure that nothing is missing and to answer any questions related to a specific form.
Documents are divided into two columns: "Recommended" and "Available." To see all documents in a column, you can scroll.
Because we’ve added an allowance for a box rental, we must include the form in the offer packet. You can do this by scrolling in Available Documents and checking Box Rental.

17. The Custom Questions section displays any additional questions relating to a particular document that must be answered, which are created per project. Click the down arrow on the right to view.

18. Once you have provided all required information, you can click Verify to continue.
![]()
19. Confirm the offer terms and click Yes, Create Offer.

