Utilize the Post A/P Transactions/Edit List [appost] screen to meticulously review and seamlessly post Accounts Payable transactions, ensuring accuracy and efficiency in financial operations.
Use the Post A/P Transactions/Edit List [appost] screen to review and post A/P transactions. You can post transactions one at a time or all transactions at the same time if you prefer.
It is recommended to first generate an Edit List, which is a list of the transactions you’ve selected prior to posting. The purpose of the Edit List is for you to review the A/P transactions for any errors and to make sure the transactions listed are indeed the ones you want to post.
You can print the Edit List or view it straight from your screen. If you need to make any corrections, you can do so in the A/P Entry [apte] screen.
After accepting the changes, generate another Edit List to verify the corrections. Once you’re satisfied with the changes, move forward with the Posting Register.
Posting is the act of permanently transferring a transaction to the Bible Report/General Ledger [bdbr]. Please note checks are posted automatically when they are printed.
Watch: How to Post A/P Transaction Items
Open
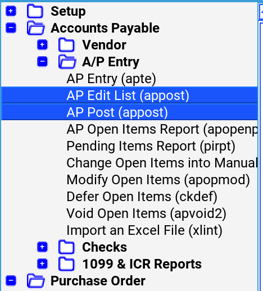
- To access the Post A/P Transactions/Edit List [appost] screen, click the A/P module, then click the A/P Entry sub-folder from the menu tree (see following screen shot). Listed are the Edit List and Post Reports. Once you click either report, you'll notice the other also becomes selected as you can view both reports from the same screen.
- The Post A/P Transactions/Edit List [appost] screen is also located in the 'Report' module under the 'A/P' sub-folder.
- You can also access this screen by typing the screen or acronym name in the blue prompt bar located above the 'Setup' menu. Then, press Enter.
The screen then appears:

- Post A/P Transactions Selection Criteria:
- To select an entry, press the F2 Key or right-click in any of these fields (Batch, Reference, Vendor, Production, Company, Bank and/or Currency) to select the item(s) needed. You can also choose multiple entries by holding down the Control Key and simultaneously using the mouse to select. By selecting, this isolates the report to only display items based on the code(s) selected. If you wish to select all unposted A/P transactions, leave all fields blank.
- Report Type:
- Defaults to Edit List to review your A/P entries and make any necessary modifications before posting. To move forward with posting, select 'Posting Register' followed by either the Print, Preview or Spreadsheet option; this will transfer the transaction(s) to the Bible Report [bdbr].
- Report Formats:
- Report Format, Report Sort and Description Of are all sorting options available for you to select per your preference.
- Include Vendor/W9 Report:
- Check mark this option to print a separate report after the A/P Edit List [appost] and/or Posting Register [appost]. The Vendor/W9 Report includes the Vendor Number, Name, and Address and displays whether the vendor has a W9 on File. This information is pulled from the Vendor Entry [apven] screen.
- Print/Preview the Report:
- Located in the top right-hand corner of the screen, you can choose the following options to generate the report:
-
-
- Print - Opens the Print Dialogue box and sends the report directly to the printer.
- Preview - Generates a PDF format report and appears instantly on your screen. You are still able to print from the PDF format.
- Spreadsheet - Generates an Excel format report and appears instantly on your screen. You are still able to print from the Excel format. If you select this option, you can have additional sorting options within Excel.
-
Please Note: Once you select 'Posting Register' followed by either the Print, Preview or Spreadsheet option, PSL+ displays the following message prompt:
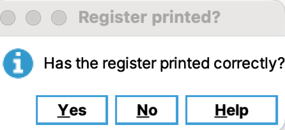
If you select 'No', PSL+ asks "Would you like to reprint the register?" If you still select 'No', you will receive a prompt notifying you the posting process is not done; therefore, you are still able to make any needed changes. If you select 'Yes', you will receive a prompt confirming the selected A/P transactions are now marked as posted.

You can retrieve the PR posting report in the “Retrieve Archived Reports" program found in the 'Report' Menu. Contact psl.support@castandcrew.com if you need this added to your database.
Please Note: If you need to make distribution changes to posted items, this can be done in the Posted Transaction / Item Editor [glfix] screen located in the ‘J/E’ module. Access is dependent on your user ID and studio permission. You can also email a request to psl.support@castandcrew.com if you need a transaction unposted. Include the Reference Number(s) in your request.
Depending on your studio's guidelines, PSL+ Support may require approval from your Studio Finance Executive before proceeding.