Jump to a section in this guide
Video: How To Set Up Bank Codes
Watch: How To Set Up Bank Codes
Use Bank Code Entry [subank] to set up a Bank Code for each bank account you intend to use during production. This screen is also where you can set up a Petty Cash Bank if needed.
The data you enter in the Bank Code Entry [subank] screen can be changed at any time, except that the Bank Code itself cannot be changed.
Please note a Bank Code record cannot be deleted once it has been used in PSL+. If you would like to print a list of all Bank Codes entered in the database, click the Report module, then Setup & Maintenance sub-folder. Listed is the Bank Codes List Report.
Open:
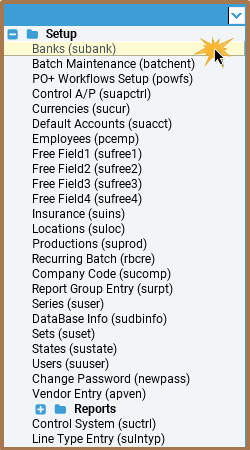
- To access the Bank Code Entry [subank] screen, click the Setup module from the menu tree (see following screenshot).
- You can also access this screen by typing the screen or acronym name in the blue prompt bar located above the "Setup: menu. Then, press Enter.
The screen will then appear:
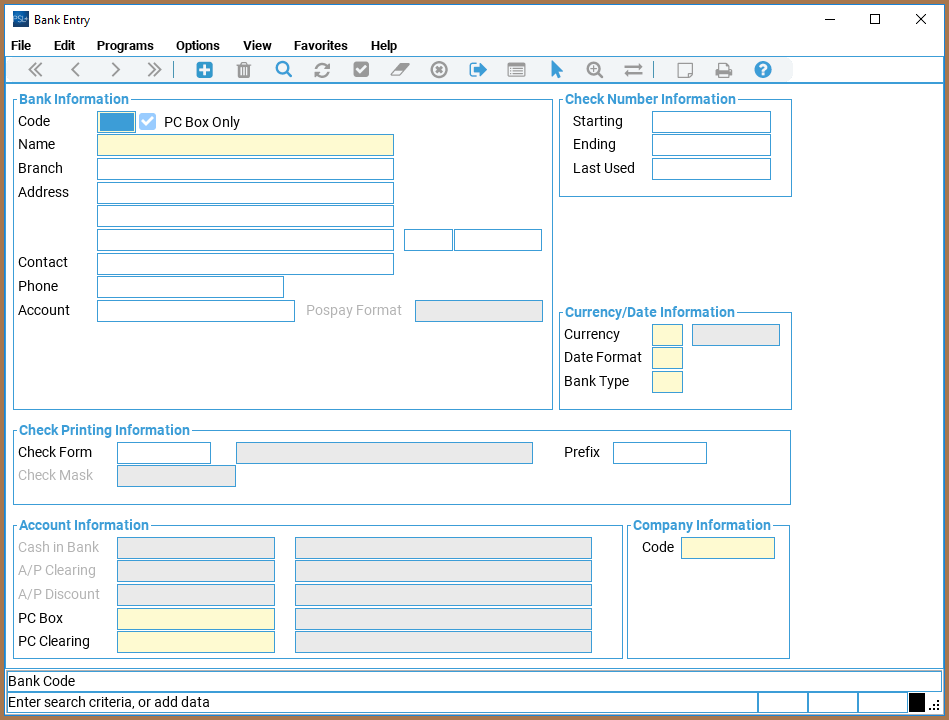
Bank Information
- Code - Input the code identifying the bank which can hold up to three alpha/numeric characters. After entering the new Bank Code, PSL+ will ask, "That Bank Code Entry is not in the database. Would you like to add it?" Select Yes.
- Name - Input the name of the bank which can hold up to 30 alpha/numeric characters.
- Enter the bank's Branch, Address, Contact, Phone, and Account if applicable.
Check Number Information
- Starting and Ending - Input the first and last check numbers from the current box of checks for this bank.
- Last Used - Number of the last check used from the current box of checks for this bank. Please note that once printed, the last used check number of the bank will default in this field.
Currency/Date Information
- Currency - Input the Currency Code associated with the Bank Code in which the currency for the checks will print. Please note the Currency Code should default in this field depending on what information was specified on the initial database request. If the Currency Code doesn't exist in PSL+, you can add it by pressing the F5 Key or by selecting the 'Zoom' icon
 located on the toolbar. This zooms into the Currency Code Entry [sucur] screen in which you can add the Currency Code immediately.
Once saved, press the F1 Key, then 'F' option or select the 'Fetch' icon to fetch the currency back to the Bank Code Entry [subank] screen.
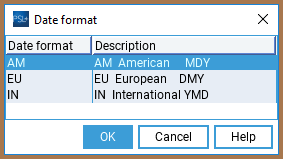
 - Date Format - Date format in which the checks for this bank will print. Press the F2 Key or right-click to view and select the date format options along with their descriptions, which are as follows:
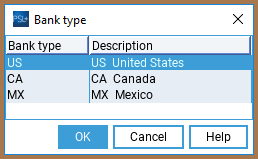
- Bank Type - Bank Type in which the checks for this bank will print. Press the F2 Key or right-click to view and select the Bank Type options along with their descriptions, which are as follows:
Check Printing Information
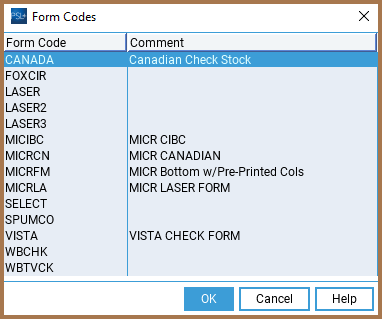
- Check Form - Input the form that matches the check stock you are using to print checks. The most common Check Form is 'LASER.' A Check Form is needed before you can print checks so if you are not sure which Check Form to select, it is suggested to select 'LASER' (for the majority of independent databases); if needed, the Support Department can make the necessary check alignment adjustments.
Press the F2 Key or right-click to view and select the Check Form options along with their descriptions which are as follows:

NOTE:
Please note PSL+ is compatible with MICR Check Printing and has its own Check Form (MICRFM or MICRLA). If you would like to have this feature set up,
please email support@castandcrew.com for more information.
- Prefix - Character(s) (usually a number) to be printed at the beginning of all check numbers. For example, if the number '3' was input in this field and the next available check number to print was 000123, then the check would print as '3 - 000123'. This field can hold up to six alpha/numeric characters.
Account Information
An account number must be input for all fields in the Account Information section even if you will not be using them all. For example, if you are not going to be using the AlP Discount field, you cannot leave this field blank, you must enter an account number as it is a white required field.
- Cash in Bank - Chart of Accounts number representing the checking account for this bank account; usually an Asset account. If the account number doesn't exist in PSL+, you can add it by pressing the F5 Key or selecting the 'Zoom' icon
 located on the toolbar. This zooms into the Chart of Accounts Entry [glca] screen in which you can add the account number immediately.
Once saved, press the F1 Key, then 'F' option or select the 'Fetch' icon to fetch the account back to the Bank Code Entry [subank] screen.
 - A/P Clearing - Chart of Accounts number representing the account from which all A/P invoices will be cleared, usually a Liability account. This account number is the credit entry also known as the offset account for A/P expenses after you post the A/P transaction(s).
- A/P Discount - Chart of Accounts number representing the account from which all A/P discount amounts will be recorded, usually a Liability account.
- P/C Box - Chart of Accounts number representing the account for the Petty Cash Box/Custodian from which Petty Cash will be disbursed, usually an Asset account.
- P/C Clearing - Chart of Accounts number representing the account from which all P/C invoices will be cleared, usually a Liability account. This account number is the credit entry also known as the offset account for P/C expenses after you post the P/C transaction(s). Please note if you will not be using a P/C Clearing account, you can input the same account number from the P/C Box field here.
Company Information
- Code - Input the Company Code associated with the Bank Code.