Load DPO File (EZYPO) provides for a fast and efficient import of Purchase Orders (P.O.) by batch from an .xml file.
Jump to a section in this guide:
Loading PSL+ CHART OF ACCOUNTS into DPO
Loading PSL+ Vendors (Suppliers) into DPO
Password Reset or Password Issues
> Not receiving password reset email
> Incorrect email address entered on DPO
DPO Book
Log into DPO via the web and create a P.O.: https://web.digitalpurchaseorder.com
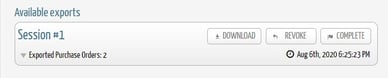
DPO will prepare a new batch file at midnight PT. This file will contain all the P.O.'s that have completed the approval cycle since the last export. If there are any problems you can revoke the batch, rectify any issues (e.g., currency issues or empty supplier fields) and the batch that was revoked will then be included in the next batch of P.O.’s. To download the session click download under Admin > Export 3rd Party. Once it’s imported into PSL+ the batch can be marked as complete.
Setup Requirements:
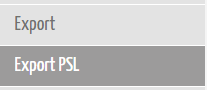
Contact DPO Support to add “Export PSL+” option to the P.O. Book.
Setup Currency codes in DPO and PSL+
SETUP Menu > Currencies > Create Currency Code.
Currency code in DPO is 3 digits. Currency in PSL+ is 2 digits. Utilize the Currency Code Conversion at the time of export.
Loading PSL+ CHART OF ACCOUNTS into DPO
From DPO: Download the Excel file template from P.O. book. Go to Admin > Import and download the Excel file.
There will then be a tab on the Excel file to add in the chart of accounts.
The Parent Account is optional, but they will need the Account Name and Account Code.
From PSL+: GL Menu > Chart of accounts List > ![]()
You can then copy and paste the necessary accounts into the DPO template. Send the updated template to support@sargent-disc.com
Once this is complete, send this to support@sargent-disc.com and they will be able to load the COA file.
Loading PSL+ Vendors (Suppliers) into DPO
From DPO: For importing suppliers it is the exact same process. Download the import document from Admin > Import, fill out the supplier information and send to support@sargent-disc.com.
From PSL+: Vendor Menu > Vendor List >
You can then copy and paste the necessary accounts into the DPO template.
Please note:
- When choosing the account number, ensure the number/code is populated and not the account description.
- DPO has more than a 30-character description allowance. PSL+ will only load the first 30 characters of the description.
- Always ensure your DPO app is up to date. If you log in and some of your DPO books are missing, an app update is likely needed. If the issue persists after updating, contact DPO support.
- DPO will prepare a batch file nightly at midnight PST. This file will contain all the P.O.'s that have completed the approval cycle since the last export.
String Coding in DPO
Example 1:
There are two sections in the PSL+ export file.
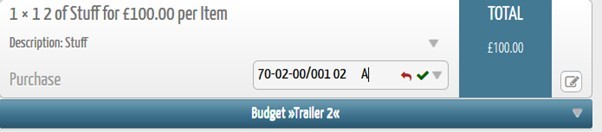
If the account mask on PSL+ is xx-xx-xx this will need to be what’s entered in the account code box in DPO.
E.g.: if the account number was 70-02-00 I would need to type this directly into the account code box shown in the screenshot below. This will pull through into the Account Number field on PSL+.

If you want to enter any additional codes IE Set, Ser, F1 etc. then you would need to put a '/' after the account code.
The order for entering this is as follows:
- Set – up to 4 digits long
- Series – up to 4 digits long
- Insurance – up to 2 digits long
- 1099 – up to 2 digits long
- Free field 1 – up to 4 digits long
- Free Field 2 – up to 4 digits long
- Free Field 3 – up to 4 digits long
- Free Field 4 – up to 4 digits long
For example, to enter 001 for the set, 02 for the series and A for free field 1, it would need to be entered as follows:
70-02-00/001 02 A
- 70-02-00/ (This is the account code followed by a / to enter in the rest of the coding) 001, as only 3 digits are being used for the set, enter a space after 001 as the field is up to 4 characters long).
- 02 (2 digits are being used for the series, then enter two spaces after 02 as the field is up to 4 characters long).
- In the above example both Insurance and 1099 are not being used, as these fields have up to 2 characters long; enter 4 spaces.
- A (1 character is being used for free field 1, enter three spaces after the A as the field is up to 4 characters long).
Another example of coding the 2nd part after the account number:
TTTTRRRRNN991111222233334444
- where TTTT is the set RRRR is the series NN is the insurance
- 99 is the 1099 code
- 1111 is free field code 1
- 2222 is free field code 2
- 3333 is free field code 3
- 4444 is free field code 4
E.g.: if the account code is 1234, the series is 000 and the set is 004, you would need to write:
1234/004 000
The reason for the space between the 4 and the 0 show above is because the set field is up to 4 digits, if you are only using 3 like shown in the example then you would need to put a space, this is the same for any other fields you are not using so for instance if you had the account as 1234, series as 000 and set as 004 and A in free field 1 then you would enter this into DPO like:
1234/004 000 A
Example 2:
How the coding will look in DPO which would line up with PSL+
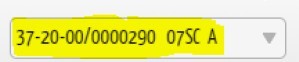
Which will be this coding string:
|
ACCOUNT |
SET |
SERIES |
INS |
1099 |
FF1 |
FF2 |
FF3 |
FF4 |
|
37-20-00 |
0000 |
290 |
N/A |
07 |
SC |
A |
N/A |
N/A |
Password Reset or Password Issues
Password Reset Link
Password resets can be requested from through the following: https://web.digitalpurchaseorder.com/newpassword.php
When requesting a password reset link, enter the email address that was used for setup.
Not receiving password reset email
If the reset link does not appear in your inbox please check in the junk/spam folder. Users can also search for the email address: do-not-reply@digitalpurchaseorder.com in case the email has been moved to an alternative folder. If the email is still not coming through, the project admin can check the email address that was used for setup by going to the Project Admin section of DPO > Users.
Incorrect email address entered on DPO
If an incorrect email address was used for setup, the project admin will need to re-invite the user with the correct email address.
https://www.youtube.com/watch?v=nF32bF1uUPo
Once the user has been re-invited with the correct email address, the old user record can be removed by the project admin. They can do this by going to Admin > Users and clicking the bin icon next to the old user record.
Please Note: If the bin icon is greyed out this will be because they have an approval level assigned to them. The project admin will need to click onto the pencil icon and remove the approval level first and click save. The bin icon will then appear to delete the old user record.
Account Locked
If the password is entered unsuccessfully 3 times your DPO account will be locked for 30 minutes. There is no way to bypass the account being locked, the account will automatically unlock after 30 minutes after receiving the email.
Ready to Export from DPO
- Log in to DPO
- Click on User Profile Name and select Administration

- Click the Export PSL+ tab
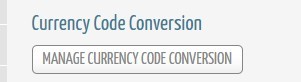
- Click Currency Code Conversation - Click here to set the currency code which will match what is set up in PSL+. This will ensure the currency CODE will export in a way PSL+ can recognize.
- Click Download and Save (DO NOT OPEN THE FILE)
Please Note: Supplier = Vendor
The supplier code in the DPO book cannot be blank. A supplier code is needed whether existing or new supplier record. If the record does not exist, then the supplier will be added to the database when imported. To add the supplier codes, go to Admin > Suppliers > and click on the pencil icon next to the supplier. Enter the supplier code for that supplier.
Locating the File
- Format*.xml files (PO12345.xml).
- Save the files in an easy location like the Desktop or My Documents.
Ready to Import into PSL+
- Log into PSL+:
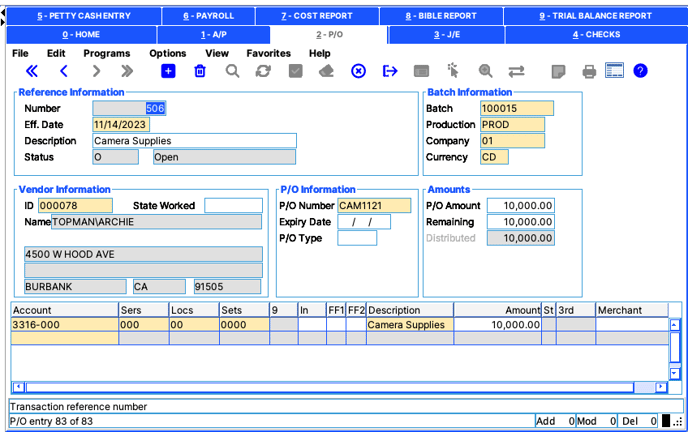
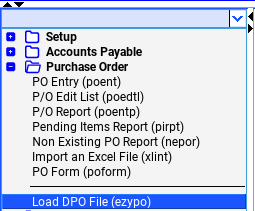
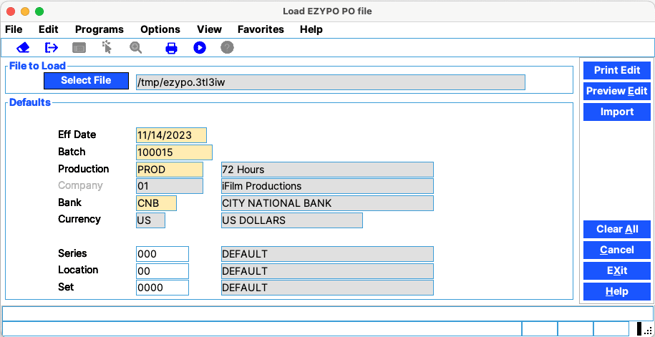
- Purchase Order Menu > Load DPO File
- Choose the Effective Date, Batch Number, Production code, Bank Code and a Default for the Series, Location and Set codes. Click Preview or Print the Edit. The Edit list will display all the Vendors that will be created and P.O. distribution information that will be imported from this file.
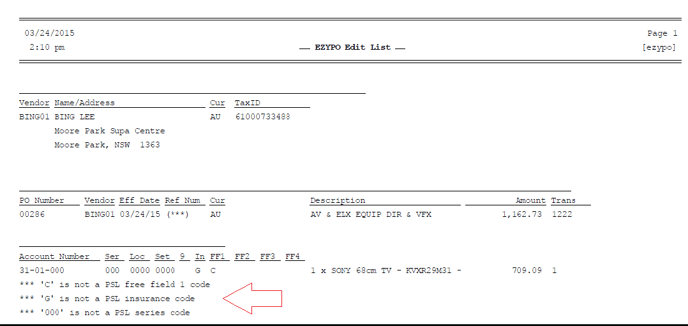
- If any errors exist, the report will detail them. For example: If a Free field, insurance code, Series, location, set, account number, etc. is used in the file but does not exist in PSL+, the user will need to add those values to load the file. E.g. account number, free field, series code, etc.
Edit List
With Errors: Errors will need to be corrected within PSL+ before import can process.
Without Errors:
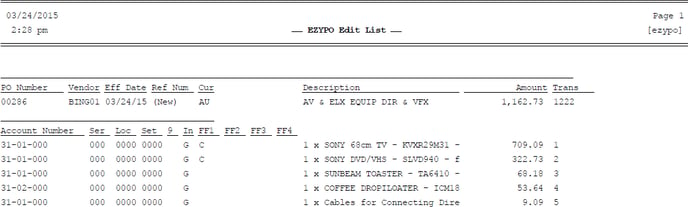
- Once the files have been reviewed and ready for import, click on ‘Import’.
- A printer box will appear, click “Print” to print the Import Register.
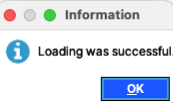
- If all data has been loaded successfully, you'll see this notification:
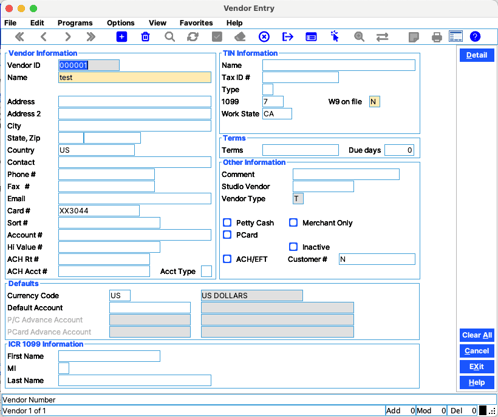
New Vendor Records
AP Menu >Vendor Menu > Vendor Entry
If the vendor does not exist:- The vendor record will be created with vendor name only, any additional information will be blank. The user will need to update the vendor name, etc.
If you would like to add vendors before loading file AP Menu > Vendor Menu > Vendor Entry
- If you have a list of vendors you would like PSL+ support to assist with uploading, contact us and we will send the .xls format for the vendor information.
- PSL+ Support can assist with vendor lists to upload. Contact PSL+ Support to receive the .xls format for vendor information.
The DPO to PSL+ Import [EZYPO] process is now complete.